[Computer Vision] CAM(Class Avtivation Map) 모델을 이용한 특징 시각화
2023. 11. 29. 17:43ㆍML&DL/CV

1. 딥러닝에서의 블랙박스
* 블랙박스란 기능을 알지만 작동 원리를 알 수 없는 시스템을 의미함
ex) 고양이/강아지를 분류하는 딥러닝 모델을 만들었다고 했을 때
-> 이미지를 고양이로 잘 분류했지만 어떤 특징을 보고 분류했을까?
-> 어떠한 근거로 결과가 도출되었는지 알 수 없다.
2. CAM (Class Avtivation Map)
* CAM은 딥러닝 모델에서 이미지의 어떤 특징을 강조했는지 알려주는 시각화 알고리즘
- CNN에서는 Convolution 레이어를 통해 특징을 추출하고, 마지막층에서는 Fully-Connected를 수행해서 분류를 한다.
- CAM은 Fully-Connected가 아닌 Global Average Pooling을 사용한다
[CAM(Class Avtivation Map)을 이용한 시각화]
목표
* 이미지 특징 추출(ResNet-18t 사용) 과정에서 CAM을 사용해 강조 부분 시각화하기
데이터셋
* STL10
- 10가지 객체가 포함되어있는 이미지 데이터셋
💻 실습
* 라이브러리 import
import numpy as np
from matplotlib import pyplot as plt
import cv2

import torch
import torchvision
import torchvision.transforms as transforms
from torch.utils.data import DataLoader
import torch.nn as nn
import torch.optim as optim
from tqdm import trange
* 데이터 불러오기
- STL10
transform = transforms.Compose([transforms.Resize(128), transforms.ToTensor(), transforms.Normalize((0.5, 0.5, 0.5), (0.5, 0.5, 0.5))])
trainset = torchvision.datasets.STL10(root='./data', split='train', download=True, transform=transform) # 96x96
trainloader = torch.utils.data.DataLoader(trainset, batch_size=32, shuffle=True)

# 10 classes: airplane, bird, car, cat, deer, dog, horse, monkey, ship, truck
* 모델 불러오기
- ResNet18
model = torchvision.models.resnet18(weights='DEFAULT')
model.conv1 = nn.Conv2d(3, 64, kernel_size=(3, 3), stride=(1, 1), padding=(1, 1), bias=False)
model.fc = nn.Linear(512, 10)
model = model.to(device)
* 모델 학습
criterion = nn.CrossEntropyLoss()
optimizer = optim.Adam(model.parameters(), lr=1e-4, weight_decay=1e-2)
num_epochs = 10
ls = 2
pbar = trange(num_epochs)
for epoch in pbar:
correct = 0
total = 0
running_loss = 0.0
for data in trainloader:
inputs, labels = data[0].to(device), data[1].to(device)
optimizer.zero_grad()
outputs = model(inputs)
loss = criterion(outputs, labels)
loss.backward()
optimizer.step()
running_loss += loss.item()
_, predicted = torch.max(outputs.detach(), 1)
total += labels.size(0)
correct += (predicted == labels).sum().item()
cost = running_loss / len(trainloader)
acc = 100*correct / total
if cost < ls:
ls = cost
torch.save(model.state_dict(), '/content/models/stl10_resnet18.pth')
pbar.set_postfix({'loss' : cost, 'train acc' : acc})correct = 0
total = 0
with torch.no_grad():
model.eval()
for data in trainloader:
images, labels = data[0].to(device), data[1].to(device)
outputs = model(images)
_, predicted = torch.max(outputs.data, 1)
total += labels.size(0)
correct += (predicted == labels).sum().item()
print('Accuracy of the network on the train images: %d %%' % (100 * correct / total))* CAM 모델
# Visualize feature maps
activation = {}
def get_activation(name):
    def hook(model, input, output):
        activation[name] = output.detach()
    return hook
def cam(model, trainset, img_sample, img_size):
model.eval()
with torch.no_grad(): # requires_grad 비활성화
model.layer4[1].bn2.register_forward_hook(get_activation('final')) # feature extraction의 마지막 feature map 구하기
data, label = trainset[img_sample] # 이미지 한 장과 라벨 불러오기
data.unsqueeze_(0) # 4차원 3차원 [피쳐수 ,너비, 높이] -> [1,피쳐수 ,너비, 높이]
output = model(data.to(device))
_, prediction = torch.max(output, 1)
act = activation['final'].squeeze() # 4차원 [1,피쳐수 ,너비, 높이] -> 3차원 [피쳐수 ,너비, 높이]
w = model.fc.weight # classifer의 가중치 불러오기
for idx in range(act.size(0)): # CAM 연산
if idx == 0:
tmp = act[idx] * w[prediction.item()][idx]
else:
tmp += act[idx] * w[prediction.item()][idx]
# 모든 이미지 팍셀값을 0~255로 스케일하기
normalized_cam = tmp.cpu().numpy()
normalized_cam = (normalized_cam - np.min(normalized_cam)) / (np.max(normalized_cam) - np.min(normalized_cam))
original_img = np.uint8((data[0][0] / 2 + 0.5) * 255)
# 원본 이미지 사이즈로 리사이즈
cam_img = cv2.resize(np.uint8(normalized_cam * 255), dsize=(img_size, img_size))
return cam_img, original_imgdef plot_cam(model, trainset, img_size, start):
end = start + 20
fig, axs = plt.subplots(2, (end - start + 1) // 2, figsize=(20, 5))
fig.subplots_adjust(hspace=.01, wspace=.01)
axs = axs.ravel()
for i in range(start, end):
cam_img, original_img = cam(model, trainset, i, img_size)
axs[i - start].imshow(original_img, cmap='gray')
axs[i - start].imshow(cam_img, cmap='jet', alpha=.5)
axs[i - start].axis('off')
plt.show()
fig.savefig('/content/results/cam.png')plot_cam(model, trainset, 128, 10)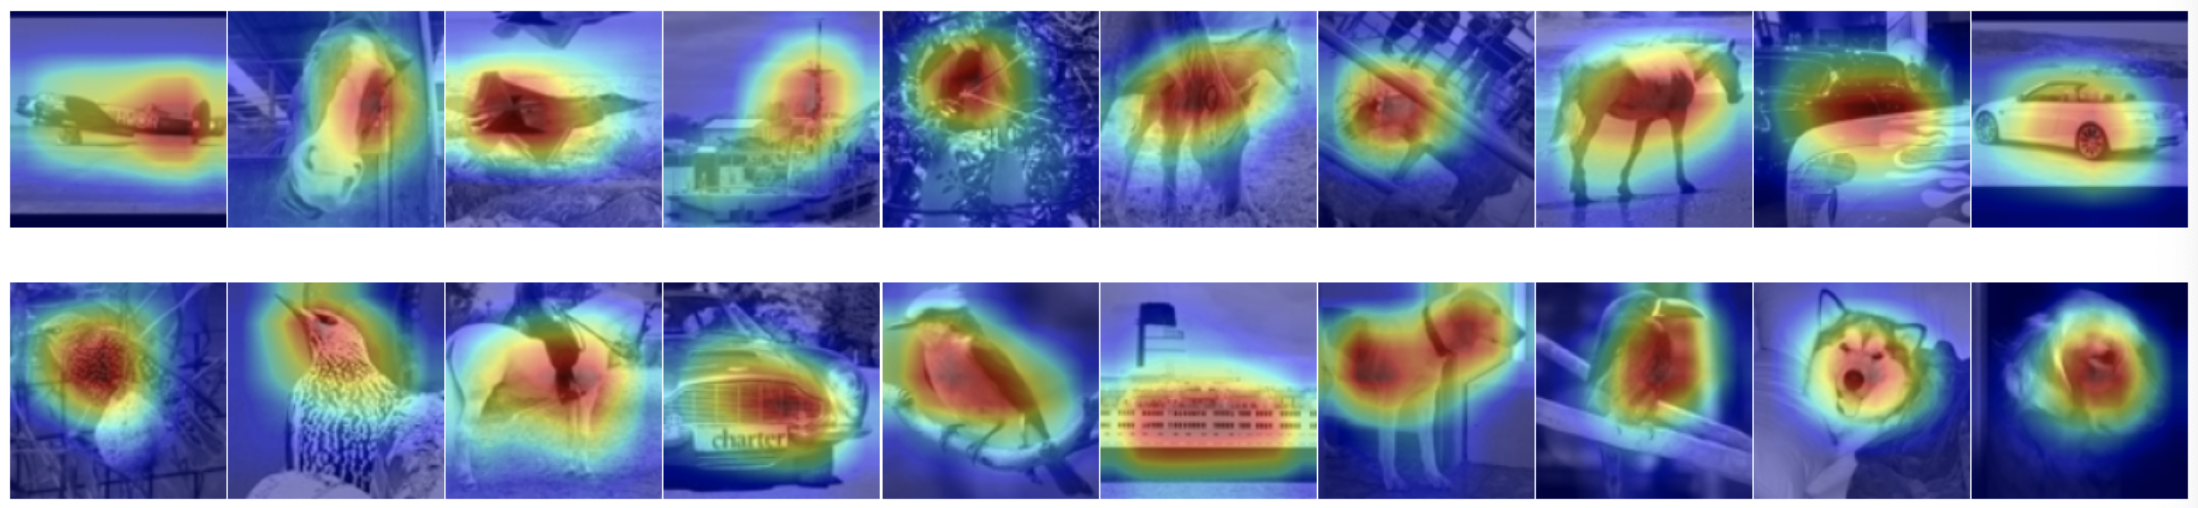
'ML&DL > CV' 카테고리의 다른 글
| [GAN] Face 생성 모델 만들기 (0) | 2023.11.28 |
|---|---|
| [GAN] CIFAR-10 데이터셋을 이용한 이미지 생성 모델 만들기 (0) | 2023.11.28 |
| [Computer Vision] GAN (Generative adversarial network) (0) | 2023.11.28 |
| [Object Detection] COCO 데이터셋을 이용한 food 객체 인식 (0) | 2023.11.27 |
| [Object Detection] COCO 데이터셋을 이용한 교통수단 객체 인식 (0) | 2023.11.24 |